- 2019-5-25
- Nessan Cleary 記事紹介
ミマキは先週の Fespaショーを使ってエントリーレベルの新しいバリエーション JFX 200 UV LEDフラットベッド機を発表しました。 新しい JFX200-2513 EXは、生産性の向上と新しい 2.5Dテクスチャプリントモードを誇り、以前の JFX200-2513に代わるものです。
Mimaki updates JFX200 flatbed printer
Mimaki used last week’s Fespa show to launch a new variation of its entry level JFX 200 UV LED flatbed. The new JFX200-2513 EX boasts improved productivity and a new 2.5D textured print mode and will replace the older JFX200-2513.
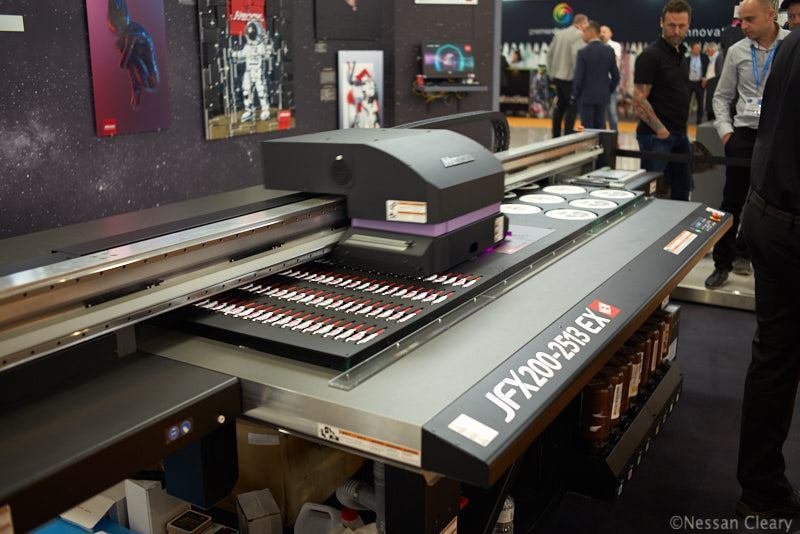
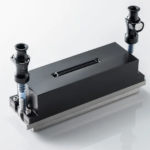
Mimaki showed off a new EX version of its JFX200-2513 flatbed.
基本仕様は同じで、プリンタの印刷領域は 2.5 x 1.3 mで、素材の高さは最大 50 mm、重量は50 kg / sqmです。それは木、ボール紙、および金属を含む多種多様な材料に印刷されます。真空テーブルはちょうど 2つのゾーンに分割されており、この新しいバージョンは真空ポンプを制御するためのフットスイッチ、機械周りの全体的な作業を改善するための小さいながらも有用な機能を備えています。
The basic specifications remain the same, so that the printer has a print area of 2.5 x 1.3m and takes substrates up to 50mm high and 50kg/sqm in weight. It will print to a wide variety of materials including wood, cardboard, and metal. The vacuum table is split into just two zones and this new version gains a footswitch to control the vacuum pump, a small but useful detail for improving the overall working around the machine.
ハードウェアの主な変更点は、この新しい EXバージョンでは追加のプリントヘッドが増えて 3つになったことです。ヘッド自体はリコー Gen5で、ヘッドあたり 4チャンネルです。これらはダブル CMYKまたは CMYKLcLmで搭載することができる 2つはインラインで並べられ、1つはプライマーやニスなどの白くて特別なインクのためにずらされています。 Mimakiは生産性の向上を主張しています。いくつかのモードでは最高 100パーセント速くなります。最大の印刷速度 35sqm /時を実現する新しいドラフトモードもあります。プリンタの解像度は、印刷モードに応じて 300〜1200 dpiの範囲です。
The main hardware change is that this new EX version gains an extra printhead so that it now has three heads. The heads themselves are Ricoh Gen5 with four channels per head. These are arranged with two inline, which can be loaded with double CMYK or CMYKlcLm, and one staggered for white and special ink such as primer or varnish. Mimaki is claiming improved productivity, up to 100 percent faster in some modes. There’s also a new draft mode, which gives a maximum printing speed of 35sqm/hr. The resolution for the printer ranges from 300 to 1200 dpi, depending on print mode.
4種類のインクセットを選択できます。これらには、CMYKと白とニスの両方を使用する LUS 120と350、CMYKと淡シアン、淡マゼンタと白の LUS 150、および同じ色とニスを含む LH 100が含まれます。LUS 350インクセットには含まれていませんが、このプリンタは PR 200のプライマーも撃つことができます。いずれにしても、そのインクセットは、おそらく今年末までは出てきません。白インクチャネルは、インク供給システムを通る再循環を使用しますが、明らかにヘッドの中の循環ではありません。
There’s a choice of four different inksets. These include LUS 120 and 350, which both use CMYK plus white and varnish, as well as LUS 150, which has CMYK plus light cyan, light magenta and white, and LH 100, which has the same colours plus varnish. This printer will also take the PR 200 primer, though not with the LUS 350 inkset, and in any case that inkset won’t be available until later, possibly the end of this year. The white ink channels use recirculation through the ink supply system but apparently not the head itself.
ミマキはまた、以前のマシンには取り付けられていなかったノズルチェックユニットを追加しました。これはセンサーを使用して、インク経路を通して光を当てることによって個々のインク滴を自動的に監視します。ノズルが塞がれてインク滴が生成されない場合は、受光センサーが光を拾います。Mimaki USAは、これがどのように機能するかを説明する便利なビデオをまとめました。ミマキヨーロッパのマネージングディレクターである池田裕司氏は、次のように付け加えています。「欠けているノズルが見つかった場合、キャリッジは清掃のためにステーションに戻ります。これが完了すると、印刷が続行されます。」
Mimaki has also added its Nozzle check unit, which was not fitted to the older machine. This uses sensors to automatically monitor individual ink droplets by shining light through the ink path. If a nozzle is blocked and doesn’t produce ink droplets then the light is picked up by a receiving sensor. Mimaki USA has put together a useful videoto explain how this works. Yuji Ikeda, managing director of Mimaki Europe, adds: “When the missing nozzles are found, the carriage returns to the station for cleaning. When this is done, it continues with the printing.”
これは NRS – ノズル回復システム – によって補完されます。これはプリンターが欠ノズルの周りに画像をマッピングします。必然的に、より多くのノズルが故障するとヘッドは交換されなければならないでしょうが、サービスエンジニアに来てもらうまでの時間を稼ぐのに便利な方法です。
This is complemented by an NRS – Nozzle Recovery System – which maps the image around the failed nozzles so that the printer can carry on printing. Inevitably, as more nozzles fail the head will eventually have to be replaced but it’s a useful way of buying time until a service engineer calls in.
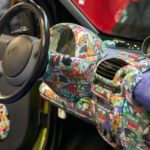
おそらく、このバージョンの最も顕著な新機能は、エンボス印刷とテクスチャ効果を作成するための 2.5Dテクスチャメーカーモードです。基本的に、Mimakiは 3Dプリンターからいくつかのテクニックを借りて、適所に UVインクの複数の層を落とすことによって三次元効果を構築しました。木目の質感、油絵の濃いインクの高さ、看板用途のエンボス文字など、さまざまな効果を作成するために使用できます。
Perhaps the most striking new feature of this version is a 2.5D Texture Maker mode for creating embossed prints and textured effects. Essentially Mimaki has borrowed some techniques from its 3D printer to build a three-dimensional effect by dropping multiple layers of UV ink in place. This can be used to create various effects such as woodgrain texture, an elevation of thick ink of an oil painting, or embossed letters for signage applications.
UVインクジェットプリンタを使ってテクスチャ画像を作成する機能について特に新しいことはありません – 大判プリンタの多くがクリアインクまたはニスを含んでいるのは、その為です。インクジェットプリンタの画質は、そのプリンタがインク滴を配置できる精度にまで及んでいます。最近の UV硬化型インクジェットプリンタでは、硬化した液滴の上に小さなインク滴を重ねることで織り目加工の効果を得ることできます。Inca Digitalの創設者の一人で、同社の最初の最高経営責任者である Bill Baxterは、既に 10年から 15年前に UVインクでできた小さな鍾乳石を印刷することでこれを私や他のジャーナリストに示しました。確かに、 Bill Baxterが当時言ったことを今も覚えていますが、2つの最も重要なことは、1)「インクジェットで重要なのは液滴の配置の正確さだけであり、その他のことは馬鹿馬鹿しいことさ」 2)「俺がジャーナリストと話すときに「馬鹿馬鹿しいこと」なんて言葉を使ったということをンカのマーケティング責任者には絶対に内緒だぜ」・・・ということです(笑)
There’s nothing new about the ability to create textured images with a UV inkjet printer – it is after all one of the reasons why so many large format printers include a clear ink or varnish. The image quality for any inkjet printer comes down to the degree of accuracy that the printer can place the ink drops, and any modern UV-curable inkjet printer should be capable of putting tiny drops of ink on top of other cured drops to build up a textured effect. I can certainly remember Bill Baxter, one of the founders behind Inca Digital and the company’s first managing director, demonstrating this to me and other journalists some ten or 15 years ago by printing small stalactites made up of UV ink. Indeed, I can still remember Baxter telling me all those years ago that the two most important things to remember were 1) that the only thing that matters in inkjet is drop placement accuracy “and everything else is bollocks”, and 2) never to tell Inca’s head of marketing that Bill used words like ‘bollocks’ when talking to journalists.
すべてのプリンタが利用可能なモードでユーザーがこれを実行できることを明確に許可しているわけではありませんが、まさにこの目的のためにニスまたはクリアインクを提供することは十分にあります。主な問題は、最初にこの種の効果をプリントするためのデザインファイルを作成することにあります、それはある程度の努力とある程度のスキルが実用です。
It is true that not all printers specifically allow their users to do this through the available modes, but plenty do offer varnish or clear inks for exactly this purpose. The main issue is in creating the design files to print these sort of effects in the first place, which does take a certain amount of effort and a degree of skill.
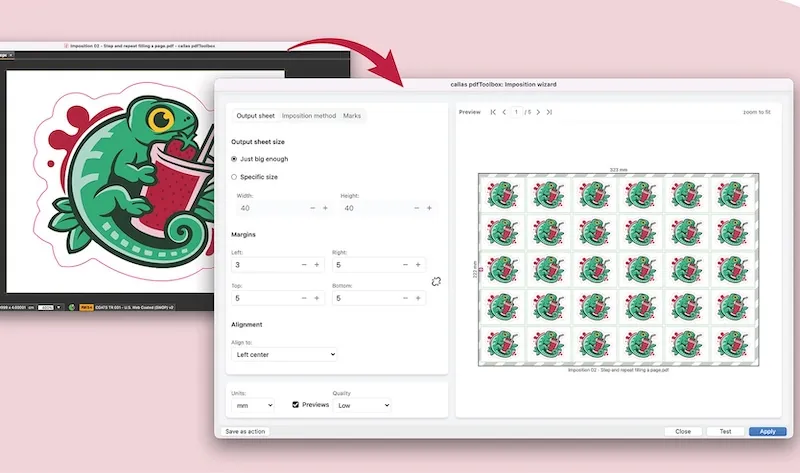
そのために Mimakiは、RasterLink 6 Plus RIPにオリジナルのカラーファイルのグレースケール画像を RIPに追加することによって、積み重ねられたステップレイヤーを作成する機能を追加しました。これは、手動でレイヤーを作成するよりもはるかに滑らかなサーフェステクスチャを与えると言われています。
To that end Mimaki has added the ability to create stacked stepped layers in its RasterLink 6 Plus RIP by adding a greyscale image of the original coloured file in the RIP. This is said to give a much smoother suface texture than manually creating the layers
池田氏は、次のように説明しています。「平均的なサイン作成者は、Illustrator / Photoshopでデータを準備するのに十分な知識を持っていません。複数のレイヤーを印刷するだけでは、2.5Dの効果はあまり得られないので、印刷データの各レイヤーを準備したり、Photoshopで明るさを調整したりするなどくぉ想像してみてください。オペレータは、グレースケールファイルとオリジナルのカラーファイルを用意し、RIPで設定を選択すると、RIPはファイルをレイヤ単位で生成します。」
Ikeda explains: “The average sign maker does not have enough knowledge to prepare the data in Illustrator/Photoshop as he or she would need a lot of skill to do so. Just printing multiple layers does not really make a nice 2.5D effect so imagine that preparing each layer of print data, adjusting the brightness on Photoshop and so on… We just made it very simple and efficient with our software. The operator needs to prepare the greyscale file plus the original coloured file, chose some setting on our RIP and then the RIP generates the file in layers.”
Mimakiはこのアプローチを使用して自動的に最大 17のレイヤーを構築することができますが、使用するレイヤーが多ければ多いほど、プリンターの速度が遅くなります。Mimakiの説明には、RasterLink 6 Plus RIPを実行している他のプリンタにはこの機能が追加できないとは明確には言っていませんが、これは Mimakiの他のプリンタでは利用できないようです。
Mimaki can build up to 17 layers automatically using this approach though obviously the more layers you use, the more this will slow down the printer. This does not appear to be available to other printers in Mimaki’s range though there’s nothing in Mimaki’s explanation that suggests it couldn’t be added to other printers running the RasterLink 6 Plus RIP.
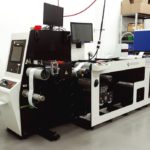
注目に値するのは、JFX200-2513 EXが初心者レベルのマシンとして設計されていることです。最速のマシンではありませんが、実際には低予算のマシンには本当に便利な機能を備えており、それによってプリントプロバイダーが追加で、付加価値のあるアプリケーションを顧客にオファーすることが可能になります。ミマキはそれを FESPAにて販促物をプリントデモし、それは確かに群衆をひきつけるようでした。ミマキのメインウェブサイトでの模擬油絵のようなもっと面白い例があります。
It’s worth noting that the JFX200-2513 EX has been designed as an entry level machine and although it’s not the fastest machine around this is actually a really useful feature to have in a budget machine and should enable print service providers to offer additional, value-added applications. Mimaki demonstrated it at Fespa printing to a range of promotional items, and that certainly seemed to draw a crowd, though there are far more interesting examples, such as simulated oil-paintings on Mimaki’s main website.
このプリンターは 6月上旬に出荷を開始する予定です。ミマキはまた、JFX 200フラットベッド、3.1 x 2.5 mのベッドを備えた 2530のより大きなバージョンを販売しています。池田氏によると、現時点でこれの EXバージョンを引き出す予定はありません。「市場の要求を聞き、必要に応じて検討したい」と付け加えています。
This printer is scheduled to start shipping in early June. Mimaki also sells a larger version of the JFX 200 flatbed, the 2530 with a 3.1 x 2.5m bed. Ikeda says there are no plans to bring out an EX version of this at the moment, adding: “We would like to hear the market demands and study if it is needed.”
詳細はミマキのサイトでご覧ください
You can find more details at www.mimaki.com.